1. Overview
What is two-factor authentication
Multi-factor authentication is a method of confirming your identity using at least two different ways of authentication. The most common and easiest to implement example of two-factor authentication uses a combination of passphrase (a complex password, often made of several words) and one-time-passcode generated by a special mobile app.
We will use the Google Authenticator app available for Android (in the Play Store) and iOS (in iTunes) to generate authentication codes.
What you’ll need
- A computer running Ubuntu 16.04 LTS or above
- A phone running Android or iOS
- A configured SSH connection
- You should understand the danger of stolen passwords.
- You don’t need to know what two-factor authentication is and how it works.
2. Installing and configuring required packages
Installing the Google Authenticator PAM module
Start a terminal session and type:
sudo apt install libpam-google-authenticator
Configuring SSH
To make SSH use the Google Authenticator PAM module, add the following line to the /etc/pam.d/sshd file:
auth required pam_google_authenticator.so
Now you need to restart the sshd daemon using:
sudo systemctl restart sshd.service
Modify /etc/ssh/sshd_config – change ChallengeResponseAuthentication from no to yes, so this part of the file looks like this:
# Change to yes to enable challenge-response passwords (beware issues with
# some PAM modules and threads)
ChallengeResponseAuthentication yes # CHANGE THIS TO YES


sudo systemctl restart sshd.service


3. Configuring authentication- Make tokens “time-base””: yes
- Update the
.google_authenticatorfile: yes - Disallow multiple uses: yes
- Increase the original generation time limit: no
- Enable rate-limiting: yes
You may have noticed the giant QR code that appeared during the process, underneath are your emergency scratch codes to be used if you don’t have access to your phone: write them down on paper and keep them in a safe place.
That’s all. Now, let’s open Google Authenticator and add our secret key to make it work.
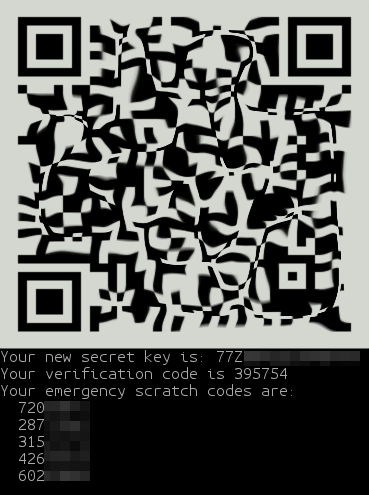
Don’t use unencrypted services to store secret keys, such as a notes synchronization service and so on. If you don’t want to type the key manually, use the QR code.
4. Adding the secret to Google Authenticator

Using the QR code
Touch the Add icon (+) and select “Scan a barcode”. Use phone camera to scan QR code.
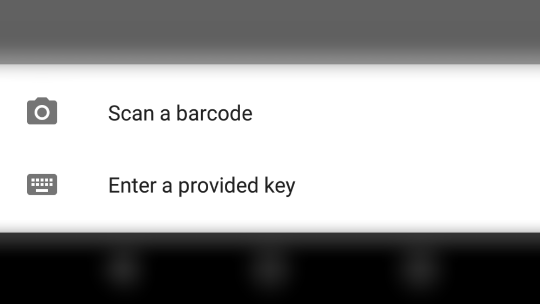
Using the through key
Touch the Add icon (+) and select “Enter a provided key”. Enter a name that you will recognise as being your 2FA method for SSH, then type the secret key provided by google-authenticator command.
